![Visual reference from Desperados 3 Let's Play Gameplay Walkthrough Pt 2 Troublemakers In Flagstone [1440p w/ Commentary] at 5:20-9:50](/published/media/desperados-3/source-323-preview-1e360a6508.jpg)

Hector's Brute Trapper Kit
Advanced
Desperados 3
- Status
- Released
- Year
- 2020
- Genre
- Strategy
- Platforms
- Windows, macOS, Linux
1. Summary
A brute-trapper character kit that combines high durability, direct takedown power, reusable trap placement, sound-based luring, limited high-noise cone damage, body handling, and self-healing. Its core loop is to isolate or redirect enemies into controlled kill zones, remove heavy targets that other kits cannot handle alone, and recover from limited exposure through a personal heal.
3. Design Intent / Job Story
When a patrol, guard cluster, or heavy enemy blocks a stealth route, I want to lure, trap, or personally overpower the threat with a durable close-range specialist, so that I can create a safe opening without relying on fragile characters or environmental accidents.
4. Role in Gameplay Loop
- Provides a high-risk, high-control answer to isolated guards, clustered enemies, and Long Coats
- Turns enemy investigation behavior into a trap-and-lure puzzle using whistle, vision cones, bushes, and patrol routes
- Serves as a durable cleanup role when alarms or reinforcements make quiet play impossible
- Supports body-management routes by carrying two bodies and throwing bodies over short distances for stuns or hiding
- Adds a recoverable exposure option through self-healing, allowing limited damage intake without consuming another character's support
5. Preconditions
- The brute-trapper character is available and controllable in the current mission
- The selected ability is available in the character action bar and not blocked by mission-specific loadout changes
- For trap play, the character has placed or can place the trap on reachable ground
- For whistle play, at least one valid target can hear or react to the whistle location
- For melee takedown, the target is within close range and the action can complete before detection or interruption
- For shotgun use, the target group is inside the cone and the player accepts the noise/alarm risk
- For self-heal, the character has taken damage and the heal cooldown is ready
6. Parameters
| Parameter | Value | Type | Notes |
|---|---|---|---|
| Health capacity | 5 bars in observed gameplay | integer | Higher durability than other squad members, supporting limited exposure and reinforcement cleanup |
| Melee takedown duration | 2.1s | duration | Fast close-range takedown timing; can resolve Long Coats without external setup |
| Melee range | 1.0 | distance | Tooltip value for close-range axe takedown |
| Melee noise radius | 3.0 | distance | Tooltip value for axe takedown noise |
| Body carry capacity | 2 bodies | integer | Allows simultaneous transport of two bodies while moving |
| Trap trigger capacity | 1 trigger per placement | integer | Trap must be manually retrieved and reset after triggering |
| Trap arming noise | Small local noise | qualitative | Very nearby enemies can hear trap setup and turn toward the character |
| Trap result vs standard enemies | Kill | state change | Kills enemies that step on it, except Long Coats |
| Trap result vs Long Coats | Stun / not instant kill | state change | Long Coats are not killed outright by trap effects |
| Trap dying animation | 5.4s | duration | Long enough for nearby patrols to notice if the body is not managed |
| Whistle valid lure targets | Gunmen, civilians, dogs | enum set | These target types walk toward the whistle location |
| Whistle invalid lure targets | Ponchos, Long Coats | enum set | These targets are briefly distracted rather than fully lured |
| Repeat whistle escalation | Second whistle causes sprint | behavior | A second whistle during investigation makes lured targets run to the location |
| Shotgun shape | Forward cone | area | Damages/kills multiple targets in a cone in front of the character |
| Shotgun result vs Long Coats | Stun | state change | Long Coats are stunned rather than instantly killed |
| Shotgun ammunition | Limited; observed/guide expectation approx. 4 shots per mission | integer | Powerful resource with scarce mission-level uses |
| Shotgun noise | Very large / alerts surrounding area | qualitative | Off-screen ear indicators and commentary show the shot can alert the area |
| Self-heal cooldown | 20s | duration | Personal heal becomes reusable after cooldown |
| Self-heal amount | Full heal | health | Restores the character to full health |
7. Core Rules
- The kit combines direct force and stealth control; its strongest safe pattern is to prepare a trap in a concealed or low-visibility location, lure a valid target, and remove the resulting body before another enemy observes it.
- The trap is reusable but not autonomous; it triggers once, then must be manually retrieved before it can be placed again.
- The trap cannot be detected by normal enemies, but placing it creates enough local noise that very nearby enemies may turn and expose the character.
- Standard enemies that step on the trap are killed; Long Coats are not killed outright and must be handled by a follow-up action or different ability.
- Whistle attracts valid targets to the character's current whistle location; Gunmen, civilians, and dogs can be lured, while Ponchos and Long Coats receive only a brief distraction.
- Whistling a second time while a target is already investigating escalates the target from walking to sprinting toward the lure location.
- Targets may refuse an impractical long path to a whistle location, so lure placement must respect reachable routes.
- Whistling from inside a bush can draw enemies into a search of that bush; this narrows their attention but exposes hidden characters if the enemy enters.
- The close-range melee takedown is fast and uniquely able to defeat Long Coats without another setup, but it still depends on line of sight, timing, and body cleanup.
- The shotgun is a limited-ammo cone attack that can delete groups, but its very large noise radius can alert the area and should be treated as a deliberate alarm-risk or cleanup tool.
- The self-heal restores full health on cooldown, enabling the kit to absorb limited damage during risky takedowns or reinforcement cleanup.
- Body carry and body throw extend the kit's control role by allowing faster corpse removal, short-range stun throws, and hiding bodies across small obstacles.
8. BDD Scenarios
Scenario: Trap-and-whistle removes an isolated guard
- Given
- the trap is placed on a reachable path outside enemy vision
- When
- the player whistles from a safe position
- Then
- the target investigates the whistle location
- And
- a valid lure target can hear the whistle
- And
- the target is removed when stepping onto the trap
- And
- the trap must be retrieved before it can be used again
Scenario: Repeat whistle accelerates an investigation
- Given
- a valid target is already walking toward a whistle location
- When
- the player whistles again before the investigation ends
- Then
- the target breaks into a sprint toward the lure location
Scenario: Invalid heavy target resists whistle lure
- Given
- a Poncho or Long Coat can hear the whistle
- When
- the player uses whistle on that target
- Then
- the target is briefly distracted
- And
- the target does not fully walk to the whistle location
Scenario: Long Coat is handled by brute melee
- Given
- a Long Coat is isolated enough for a close-range action
- When
- the player executes the brute melee takedown
- Then
- the Long Coat is defeated without requiring a second character or environmental setup
Scenario: Shotgun clears a cone at alarm risk
- Given
- multiple enemies are inside the shotgun cone
- When
- the player fires the shotgun
- Then
- standard enemies in the cone are killed
- And
- Long Coats in the cone are stunned rather than instantly killed
- And
- the large noise radius can alert enemies in the surrounding area
Scenario: Self-heal recovers from controlled exposure
- Given
- the brute-trapper character has missing health
- When
- the player uses the personal drink ability
- Then
- the character returns to full health
- And
- the heal cooldown is ready
- And
- the heal enters cooldown before it can be used again
Scenario: Body capacity improves cleanup
- Given
- one or two bodies need to be removed from a danger area
- When
- the player orders the brute-trapper character to carry bodies
- Then
- up to two bodies can be transported together
- And
- bodies can be thrown a short distance to stun or reposition them
9. Edge Cases
- A trap placed too close to an enemy can create setup noise that causes the enemy to turn and spot the character
- A triggered trap left in the field cannot be reused until the player manually retrieves it
- A trapped enemy's death or stun animation can be seen by patrols before the body is moved
- Long Coats are not a universal trap or shotgun kill target and may require melee or follow-up handling
- Ponchos and Long Coats may react to whistle without fully pathing into the intended ambush
- A second whistle can make a target sprint, which may break carefully timed patrol gaps or arrive before the player is ready
- A whistle location that requires an impractical detour may fail to lure the target
- Whistling from a bush can cause an enemy to inspect the bush and reveal hidden characters
- Shotgun use may solve the immediate cluster but trigger a wider alarm due to noise
- Limited shotgun ammunition can leave the player without a cleanup option later in the mission
- Self-heal cannot help if lethal incoming damage arrives before the ability is used or while it is on cooldown
- Body throw range is short and can fail to place bodies behind intended cover or into intended bushes
10. QA Notes
- Verify trap placement, trigger, retrieval, and re-placement in normal terrain, bushes, and near enemy vision cones
- Verify trap setup noise by placing it at varying distances from idle and patrolling enemies
- Verify standard enemies are killed by the trap while Long Coats are not killed outright
- Verify whistle lure behavior for Gunmen, civilians, dogs, Ponchos, and Long Coats
- Verify second-whistle sprint behavior only occurs while the target is still investigating
- Verify whistle pathing fails gracefully when the lure location is unreachable or requires an excessive detour
- Verify bush whistle behavior, including enemy inspection and discovery of hidden characters inside the bush
- Verify melee takedown timing, noise radius, and Long Coat defeat behavior
- Verify shotgun cone hit detection, Long Coat stun behavior, ammunition consumption, and noise/alarm indicators
- Verify self-heal restores full health, respects the 20-second cooldown, and cannot be spammed
- Verify carrying two bodies preserves movement behavior and that body throw can stun and reposition bodies over short obstacles
- Verify Showdown Mode can queue kit actions without changing their timing, ammo, cooldown, or noise outcomes
11. Mechanic Dependencies
- Showdown Synchronized Planning (Showdown Mode can synchronize trap, whistle, melee, shotgun, or cleanup actions with other squad actions while preserving their timing and risk.)
- Squad Character Ability System (The kit is one character-specific expression of the broader squad ability system, using action-bar abilities, cooldowns, limited resources, and mission-dependent loadouts.)
- Takedown and Body Control (The kit extends takedown and body control through fast melee, Long Coat defeat, two-body carrying, body throwing, and post-kill corpse management.)
- Enemy Perception and Alarm AI (Trap safety, lure placement, melee timing, and body cleanup rely on enemy vision cones, detection states, and alarm responses.)
- Lethal and Non-Lethal Combat Resource Limits (The shotgun's limited ammunition and the self-heal cooldown are resource limits that shape when the player can spend loud force or recover health.)
- Distraction and Noise Manipulation (Whistle, trap setup noise, and shotgun noise all depend on enemy hearing, investigation, and lure behaviors defined by distraction and noise manipulation.)
12. UI Links
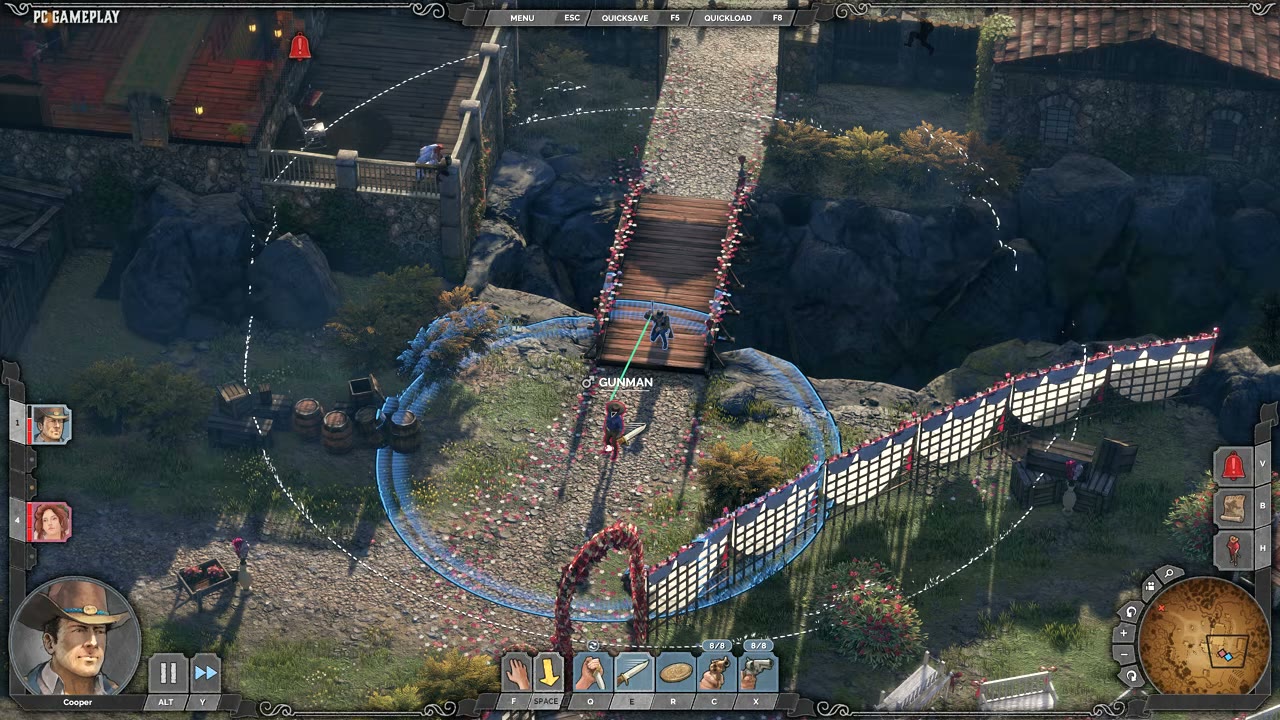
- Character Roster And Selected Portrait - The roster and selected portrait identify the active character, health state, and whether the brute-trapper kit is currently selected for orders.
- Character Action Bar - The character action bar exposes the kit's abilities, hotkeys, ammo counts, cooldown readiness, and tooltips such as melee range, noise radius, and duration.
- Right Side Alert And Hint Buttons - Alert and hint buttons surface warnings or tutorial prompts when loud actions, enemy reactions, or learnable kit interactions need player attention.
- Showdown Mode Execution Interface - The Showdown Mode interface queues and executes this kit's timed actions alongside other squad abilities for synchronized takedowns and lures.
- Tactical Spatial Markers - Tactical spatial markers display vision cones, lure targeting circles, trap placement feedback, noise/ear indicators, and target labels that make the kit's risk areas readable.
- Tutorial Prompts And Instruction Slides - Tutorial prompts introduce the trap-and-whistle combo and Long Coat rules with embedded gameplay examples and explanatory text.
References
- 1.
Steam Community :: Guide :: In-Depth Character Guide (L150-190 of 336)
- 2.
Desperados 3 Let's Play Gameplay Walkthrough Pt 2 Troublemakers In Flagstone [1440p w/ Commentary] (5:20-9:50)
- 3.
Steam Community :: Guide :: Character guides and tricks. (L50-75 of 167)
- 4.
DESPERADOS III - Know THESE Important Tips Before Playing (8:10-8:25)